Overview
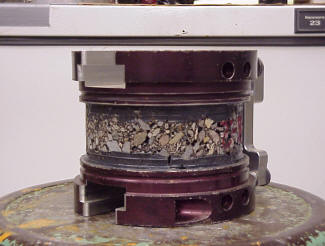
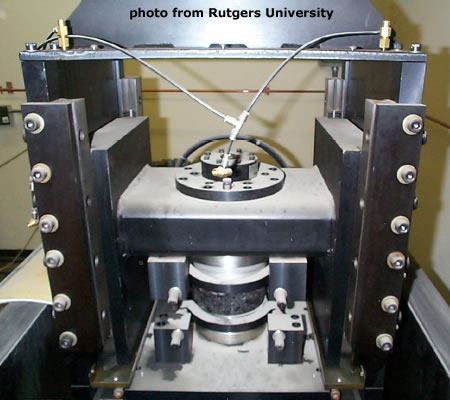
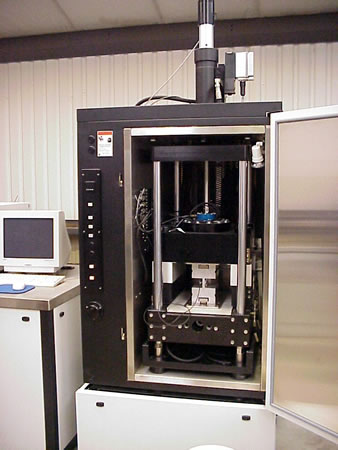
The Superpave Shear Tester (SST) (Figure 1) is used to characterize a HMA mixture’s resistance to permanent deformation (rut resistance). This characterization can be used as a performance test for HMA mixtures designed using Superpave mix design or other mix design procedures. The SST machine can perform several different tests to characterized HMA samples.
The most common SST tests, the repeated shear at constant height (RSCH) and the frequency sweep at constant height (FSCH) tests subject a short HMA cylinder to repeated shear in a pulse manner (RSCH) or a range of loading frequencies (FSCH) in a controlled atmosphere. Results from the RSCH test are used to determine the accumulation of permanent shear strain with load repetitions. Results from the FSCH test are used to determine the sample’s complex shear modulus (G*) and phase angle (φ). These characteristics can then be used to predict a HMA mixture’s permanent deformation potential. Because of the testing equipment complexity and cost, the SST is primarily research equipment and is not a standard test in Superpave mix design or quality assurance testing.
The standard SST procedures are found in:
- AASHTO T 320: Determining the Permanent Shear Strain and Stiffness of Asphalt Mixtures Using the Superpave Shear Tester (SST)
Background
Most rutting in HMA pavements is due to shear deformation of the HMA layer so long as air void content (Va) is below about 9 percent (Monismith, 2004[1]). Further, these shear deformations are usually limited to the upper portion of the HMA layer (Figure 2). Therefore, a laboratory test that measures shear deformation in the upper HMA layer (3 to 4 inches (75 to 100 mm) typically) seems to be an effective way to define the propensity of a HMA mixture to rut.
The Superpave Shear Tester (SST) was developed as part of SHRP research to be one of the HMA mixture performance testers for Superpave mix design. Although it is quite versatile and reasonably able to predict HMA pavement permanent deformation, it has not been widely adopted because of its complexity and cost. It is, however, a valuable HMA research tool and is also being used, where feasible, to conduct performance tests for mixture design (Monismith, 2004[1]).
SST Tests
The SST, as developed by SHRP research, can perform the following four tests related to HMA performance:
- Shear at Constant Height (RSCH)
- Frequency Sweep at Constant Height (FSCH)
- Simple Shear at Constant Height (SSCH)
- Repeated Shear at Constant Stress Ratio (RSCSR)
Currently, the first three tests are described in AASHTO T 320, with the most popular being the RSCH and the FSCH. The RSCSR can also be used but is generally not performed as widely as the other three tests.
Repeated Shear at a Constant Height (RSCH)
The RSCH test is a test that repeatedly loads a HMA sample in shear and measures cumulative permanent deformation as a function of the number of load cycles (Figure 3). The test is typically conducted without a confining pressure (called an “unconfined” test). A typical test might plot something like Figure 4.
The cumulative permanent shear strain of a measured sample can be divided into two major zones (Figure 5):
- Primary. Strain rate decreases with loading time.
- Secondary. Strain rate is constant with loading time.
Typically, the 5,000 cycles used in the RSCH test are enough to develop the secondary portion of the curve so that its slope can be determined. This type of test is similar to the flow number tests for the SPT except that there is not tertiary zone since it is an artifact of the triaxially loaded sample in the SPT.
NCHRP Project 9-19 reports that while the resilient strain and the resilient modulus from this test gave fair correlations with rut depth in the field, the shear strain at 3,000 load cycles provided the best correlation with field rut depth.
Frequency Sweep at a Constant Height (FSCH)
The FSCH test is a shear dynamic modulus test that measures a sample’s stress-strain relationship under a continuous sinusoidal shear loading at a constant shear strain. It measures peak stress and strain values and the time lag between them (Figure 6). The test is conducted without a confining pressure (called an “unconfined” test). A typical series of tests might plot something like Figure 7.
For linear viscoelastic materials (stress-strain ratio is independent of the loading stress applied) such as HMA, the relationship between applied shear stress and resulting shear strain is defined by a complex number called the “complex shear modulus” (G*) (Witczak et al., 2002[2]) as seen in the equations below:
![]()
![]()
![]()

Where:
- G* = shear complex modulus
- G’= shear storage (or elastic) modulus component
- G” = shear loss (or viscous) modulus component
- i= imaginary number
- |G*| = shear dynamic modulus
- τ0 = peak dynamic shear stress
- γ0 = peak recoverable shear strain
- φ= phase angle – the angle by which γ0 lags behind τ0. For a pure elastic material, φ = 0, and the shear dynamic modulus (G*) is equal to the absolute value, or shear dynamic modulus. For pure viscous materials, φ = 90°.
- ti= time lag between stress and strain cycles (s)
- tp = time for a stress cycle (s)
These equations are the same as those discussed in the SPT section for complex modulus although traditionally the term E* is replace by G* to denote shear dynamic modulus and σo and εo are replaced by τ0 and γ0 to denote shear stress and axial strain respectively.
As seen from the above equations, the shear complex modulus, G*, is actually the summation of two components: (1) the shear storage modulus component and (2) the shear loss or viscous modulus. Therefore, it can be an indicator of the viscous properties of the material being evaluated, which can be related to HMA permanent deformation.
NCHRP Project 9-19 reports that the |G*| parameter seems to correlate reasonably well with rut depth as measured in the field. In theory, the |G*|/sinφ parameter should work better based on the same reasoning of the SPT dynamic modulus test. However, in practice it does not predict permanent deformation any better than |G*| alone (Witczak et al., 2002[2]). HMA using modified binders can sometimes give results where stiffness as measured by |G*| is not necessarily related to performance.
Simple Shear at Constant Height (SSCH)
The SSCH test is a shear creep test that measures a sample’s maximum shear strain that occurs during the test and the permanent shear strain at the end of the test (Figure 8). The test is conducted without a confining pressure (called an “unconfined” test).
This test can be used to estimate a HMA mixture’s susceptibility to permanent deformation because it measures the sample’s ability to resist shear strain (Bennett et al., 2004[3]). At high test temperatures (e.g. 104°F (40°C), lower creep strains indicate an ability to resist permanent deformation, while at low test temperatures (e.g. 39 °F (4°C)), higher creep strains indicate an ability to flex and relieve stresses rather than crack (Bennett et al., 2004[3]).
In theory, creep tests tend to under predict permanent deformation because as they progress the aggregate within the HMA sample tends to unlock from a tight formation, then most likely reorient and lock up again under the constant creep load. This secondary locking tends to resist further deformation. In the field, however, the repetitive nature of the wheel loads traversing the HMA pavement subjects the HMA to a number of loads in succession rather than one continuous load. This type of cyclic loading does not permit aggregate locking to occur (Sousa et al., 1994[4]).
Repeated Shear at Constant Stress Ratio (RSCSR)
The RSCRS test repeatedly loads a HMA sample in shear such that the ratio of shear load to axial load is constant throughout the test. As with the RSCH, the test measures cumulative permanent deformation as a function of the number of load cycles. The RSCSR test is a test used to evaluate the potential of a HMA mixture to rut. Extreme instability is indicated by a rapidly increasing permanent shear strain with additional load cycles (Figure 9). The test is conducted without a confining pressure (called an “unconfined” test).
Concepts Related to the SST
When using the SST or interpreting results from SST tests, several basic concepts should be understood.
Constant Height Requirement
All three of the currently used SST tests (FSCH, RSCH and SSCH) actively maintain the HMA sample at constant height throughout the testing. This is done by a LVDT that measures height and then feeds this information back to the SST vertical actuators, which then generally act to compress the sample in order to maintain a constant height.
The constant height requirement is a reflection of the need to simulate the interaction of shear and volumetric strains within the HMA sample. An induced shear strain causes the aggregate particles within HMA to roll past one another in an attempt to accommodate the strain through deformation. If unconfined, the HMA actually expands as the aggregate particles roll from a tight formation to a more loose formation (Figure 10). This phenomenon is often referred to as “shear dilatency” (Sousa et al., 1994[4]). In the field, however, the HMA within a pavement is substantially confined by the HMA around it. This confinement works to resist expansion, which prevents aggregate movement. This, in turn, provides an increase in shear stiffness that reduces permanent deformation. Therefore, unless a test is able to simulate this confining effect, it may overestimate permanent deformation. The SST simulates this confining effect by maintaining the test sample at a constant height. The tenancy for the aggregate particles to roll past one another and increase the sample volume is counteracted by the SST vertical actuators that confine the sample vertically based on the LVDT-measured amount of vertical strain.
Sensitivity to Compaction Method
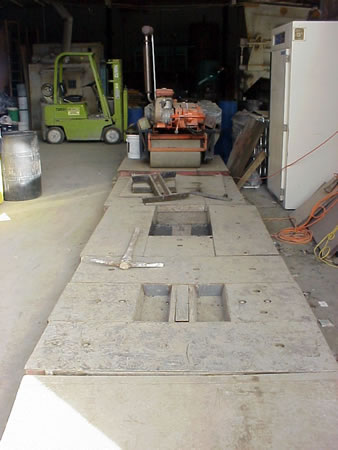
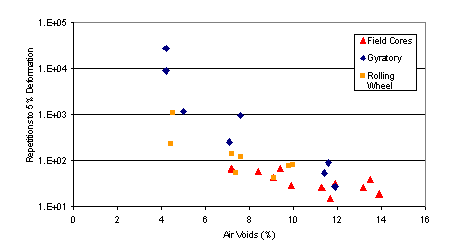
The SST tests are sensitive to sample compaction method. Samples compacted with the SGC (the standard method) tend to exhibit greater resistance to permanent deformation than cores extracted from the field or samples compacted with the rolling wheel compactor (Figure 11). Figure 12 shows that rolling wheel compacted samples show about the same resistance to permanent deformation as field cores. This is why some researchers advocate the use of the rolling wheel compactor when making SST and other HMA test samples.
Sensitivity to Sample Air Void Content (Va)
As with many HMA tests, the SST tests are sensitive to sample air void content (Va). For a given mix in the RSCH test, the number of repetitions to 5 percent permanent shear strain is a function of its air-void content, increasing as the air-void content is decreased to a value between 3 and 2 percent (Figure 13). Below an air-void content of about 2 percent, with further decrease in air-void content, the number of repetitions again decreases.
Sample Size
Sample size needs to be large enough such that measurements reflect global material characteristics rather than characteristics of individual constituents such as aggregate particles. The sample dimensions that achieve this are referred to as the representative volume element (RVE), defined as the smallest volume large enough so that the global characteristics of the material remain constant, regardless of the location of the RVE (Monismith, 2004). Sample sizes smaller than the RVE produce much variability and can show bias so they may not be statistically meaningful. Results of typical SST tests show these signs, indicating samples smaller than the RVE (Weissman et al., 1999[5] and Harvey and Long, 1999[6]).
Test Description
The following is a brief summary of the three main SST tests: RSCH, FSCH and SSCH. It is not a complete procedure and should not be used to perform the test. The complete test procedure for all three main SST tests can be found in:
- AASHTO T 320: Determining the Permanent Shear Strain and Stiffness of Asphalt Mixtures Using the Superpave Shear Tester (SST)
Summary
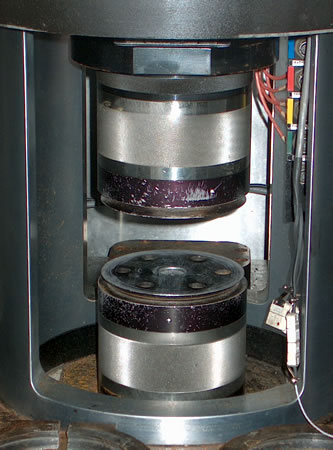
A sample that is typically 6 inches (150 mm) in diameter and 2 inches (50 mm) or 1.5 inches (38 mm) tall is glued between two platens and inserted into the SST. The platens are attached to the SST hydraulic actuators and moved side-to-side in the SST to induce a shear stress within the HMA sample. The manner of this side-to-side movement is determined by the type of test run. The RSCH uses a cyclic movement that creates 10 psi (69 kPa) of shear stress for 0.1 seconds followed by a 0.6 second rest period. The FSCH uses a sinusoidal movement that creates a 0.01 percent shear strain for a given number of cycles at specified cycle frequencies. The SSCH applies a single shear stress of a given amount over a short duration (dependent upon the test temperature). Each of these three tests maintains the HMA sample at constant height by using axial LVDTs to measure sample height and adjust the SST vertical actuators accordingly. Figure 14 shows an sample in the SST with LVDTs attached.
Approximate Test Time
It takes about 1 week for sample preparation and testing in the SST. About 2 days of this is actual time in the SST.
Basic Procedure
The basic procedure is described in three sections: sample preparation, preparing sample for testing and testing. The testing section is broken up into the three common SST tests: RSST-CH, FSCH and simple shear.
Sample Preparation
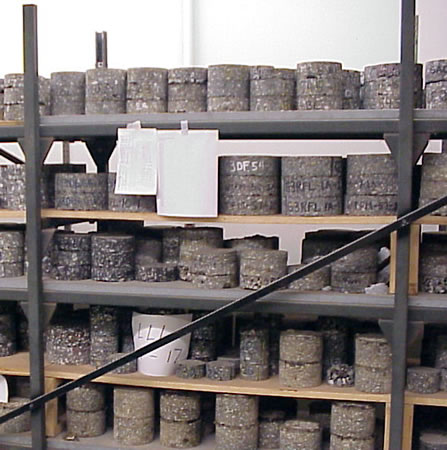
The SST can be used to perform tests on 3 types of samples. Testing samples are typically 6 inches (150 mm) in diameter by either 2 inches (50 mm) tall (for 0.75 inch (19.0 mm) NMAS) or 1.5 inches (38 mm) tall (for small er NMAS) (Figure 15).
Laboratory-Mixed, Laboratory-Compacted Samples (LMLC)
- Mix an appropriate amount of heated asphalt binder and heated aggregate to produce samples that are 6 inches (150 mm) in diameter and 2 inches (50 mm) tall. Typically, a SGC compacted sample is made tall enough so that when each end is cut off there remains enough height to produce two 2 inch (50 mm) tall SST samples.
- Condition the HMA mixture by placing it in an oven at 275°F (135°C) for 4 hours. This is called “short-term conditioning”.
- Compact the HMA mixture using the SGC or other compaction device such as the rolling wheel compactor. For the RSCH test, compaction is typically to 4.0 percent air voids (Va). For the FSCH and SSCH tests, compaction is typically to 7.0 percent air voids (Va).
Because of this, samples are often compacted to a air void content (Va) slightly higher than that desired for testing. Usually a air void content (Va) 1.0 percent higher than desired is sufficient (AASHTO, 2000c).
- Allow the compacted samples to cool to room temperature and cut them to proper test dimensions of 6 inches (150 mm) in diameter by either 2 inches (50 mm) tall (for 0.75 inch (19.0 mm) NMAS) or 1.5 inches (38 mm) tall (for smaller NMAS). The cut faces should be parallel to within 2 mm of each other.
- Determine the air void content (Va) and height of the cut samples.
Field-Mixed, Laboratory-Compacted Samples (FMLC)
- Obtain a representative field sample of loose HMA of sufficient quantity to produce samples that are 6 inches (150 mm) in diameter and 2 inches (50 mm) tall.
- Compact the HMA mixture using the SGC or other compaction device such as the rolling wheel compactor. For the RSCH test, compaction is typically to 4.0 percent air voids (Va). For the FSCH and SSCH tests, compaction is typically to 7.0 percent air voids (Va).
- Allow the compacted samples to cool to room temperature and cut them to proper test dimensions of 6 inches (150 mm) in diameter by either 2 inches (50 mm) tall (for 0.75 inch (19.0 mm) NMAS) or 1.5 inches (38 mm) tall (for smaller NMAS). The cut faces should be parallel to within 2 mm of each other.
- Determine the air void content (Va) and height of the cut samples.
Field-Mixed, Field-Compacted Samples (FMFC)
- Obtain HMA pavement samples that are a minimum of 6 inches (150 mm) in diameter and 1.5 inches (38 mm) tall. This is usually done by coring.
- Cut the samples to proper test dimensions of 6 inches (150 mm) in diameter by either 2 inches (50 mm) tall (for 0.75 inch (19.0 mm) NMAS) or 1.5 inches (38 mm) tall (for smaller NMAS). The cut faces should be parallel to within 2 mm of each other.
- Determine the air void content (Va) and height of the cut samples.
Prepare for Testing
- Ensure the platens are clean, aligned and in place.
- Glue the sample to the top and bottom platens using epoxy cement applied to the sample top and bottom and platens (Figure 16). Apply a light pressure for about 5 minutes afterwards.
- Allow the epoxy to cure for the manufacturer’s recommended time.
- Warm up the SST for at least 1 hour before testing.
- Condition the sample for at least 2 hours at the required testing temperature.
- RSCH: the 7-day maximum pavement temperature (at a depth of 2 inches (50 mm) in the pavement).
- FSCH: Any temperature so long as it is not higher than 22°F (12°C) less than the high temperature asphalt binder grade. Non-linear response generally occurs above this temperature. The temperature must also be high enough so that the sample stiffness is less than 435 psi (3 MPa) because of equipment constraints.
- SSCH: Any temperature. The same sample can be tested at multiple temperatures below 104°F (40°C). Above this temperature, some permanent shear strain occurs in the sample. Once a sample is tested at 104°F (40°C) it should not be tested further.
- Insert the sample (with platens attached) into the SST, attach the LVDTs to the platens and zero the LVDTs.
- Center the sample between the test heads and secure the platens to the test heads using the hydraulic clamps (Figure 17).
- Lower the environmental chamber and lock into place. Allow the sample temperature to stabilize for 20 to 60 minutes.
Testing
Repeated Shear Test at Constant Height (RSCH)
- Apply a repeated haversine shear stress to the sample of 10 psi (69 kPa) for 0.1 seconds followed by a 0.6 second rest period. Maintain the sample height constant during this loading. The vertical actuator does this by moving in response to the vertical LVDT measurements.
- Continue the test for 5000 load cycles or until 5 percent shear strain is reached.
- Release the loads, disconnect the LVDTs, remove the sample from the test chamber and remove the platens by heating the sample in an oven for 1 hour at 275°F (135°C) to debond the epoxy.
Shear Frequency Sweep Test at Constant Height (FSCH)
- Precondition the sample by applying a sinusoidal shear strain of 0.01 percent at 10 Hz for 100 cycles. Maintain the sample height constant during this loading. The vertical actuator does this by moving in response to the vertical LVDT measurements.
- Perform the shear frequency sweep by applying a shear strain of 0.01 percent at the frequencies and number of cycles listed in Table 1.
Table 1: FSCH Testing Frequencies and Number of Cycles
| Frequency | Number of Cycles |
|---|---|
| 10 | 50 |
| 5 | 50 |
| 2 | 20 |
| 1 | 20 |
| 0.5 | 7 |
| 0.2 | 7 |
| 0.1 | 7 |
| 0.05 | 4 |
| 0.02 | 4 |
| 0.01 | 4 |
- Release the loads, disconnect the LVDTs and remove the sample from the test chamber.
- If the test is to be repeated at another temperature, return the sample to the conditioning chamber and set the temperature of the conditioning chamber and SST to the next temperature. After conditioning, repeat the FSCH at the new temperature.
- Once all FSCH testing temperatures are complete, remove the platens from the sample by heating the sample in an oven for 1 hour at 275°F (135°C) to debond the epoxy.
Simple Shear Test at Constant Height (SSCH)
- Determine the shear stress level for the test from Table 2:
Table 2: Shear Stress Level for Given Test Temperatures
| Temperature | Shear Stress |
|---|---|
| 39°F (4°C) | 50 psi (345 kPa) |
| 68°F (20°C) | 15 psi (105 kPa) |
| 104°F (40°C) | 5 psi (35 kPa) |
- Increase the shear stress to the specified shear stress level for the test at a rate of 10 psi (70 kPa) per second. Maintain the specified shear stress level for 10 seconds. Maintain the sample height constant during this loading. The vertical actuator does this by moving in response to the vertical LVDT measurements.
- Reduce the shear stress to zero at a rate of 3.6 psi (25 kPa) per second. Maintain zero shear stress for 10 seconds.
- Release the loads, disconnect the LVDTs and remove the sample from the test chamber.
- If the test is to be repeated at another temperature, return the sample to the conditioning chamber and set the temperature of the conditioning chamber and SST to the next temperature. After conditioning, repeat the simple shear test at the new temperature.
- Once all simple shear testing temperatures are complete, remove the platens from the sample by heating the sample in an oven for 1 hour at 275°F (135°C) to debond the epoxy.
Results
Parameters Measured
The SST can measure many parameters but the most typical are: permanent shear strain, shear dynamic modulus (|G*|), phase angle (φ), maximum shear strain and recovery.
Specifications
Superpave mix design does not specify limits on SST-measured properties. Some larger agencies and research centers with SST testing experience may have recommended limits for certain HMA mixtures and traffic loading scenarios. The basic procedure for determining shear strain criteria for the RSCH test is:
- Choose an acceptable maximum rut depth for the pavement in question.
- Convert this field rut depth to an equivalent plastic strain to be used in the SST. This involves a correction or “shift” factor. The equation is usually of the form:
![]()
Where:
- K = Shift factor relating rut depth to plastic strain. Determined experimentally.
- γp = limiting plastic strain to be used in the laboratory.
- Estimate traffic loading of the pavement in question.
- Determine the number of SST repetitions needed to simulate this loading. This involves taking the expected loading (typically in terms of ESALs) and multiplying it by a temperature correction factor (TCF) and shift factor. The temperature correction factor is to account for the fact that in practice, rutting occurs more hot summer months than cold winter months. Therefore, a factor is used to account for the smaller impact on rutting that the winter loading has.
- Run the RSCH test for the determined number of repetitions (simulates traffic) and ensure that plastic strain does not exceed the determined value (simulates rutting).
For the reconstruction of Interstate 710 in Long Beach, CA, this procedure resulted in the choice of 660,000 shear repetitions with a not-to-exceed plastic strain value of 5 percent.
Typical Values
Shear dynamic modulus (G*) values depend upon test temperature, frequency and the HMA composition. For a PG 64-22, typical values for 0.01 Hz test frequency can range from about 1,000 psi (6.9 MPa) to 100,000 psi (690 MPa), while typical values for 10 Hz test frequency can range from about 100,000 psi (690 MPa) to near 1,000,000 psi (6900 MPa) (Bennert et al., 2003[7]).
Typical phase angles can be from 10 to 60 degrees depending upon loading frequency, loading temperature, aggregate type, asphalt binder type, modifiers and HMA age (Figure 18).
Calculations (Interactive Equations)
Repeated Shear at Constant Height (RSCH)
The permanent shear strain is calculated as follows:
Where:
- γp = permanent shear strain
- δshear,final = final recorded deformation by the shear LVDT at the end of the test
- δshear,initial = initial recorded deformation by the shear LVDT at the beginning of the test (should be zero)
- h = sample height (platen to platen)
Frequency Sweep at a Constant Height (FSCH)
Several calculations are done to determine shear dynamic modulus. These calculations are very similar to those done for the SPT dynamic modulus test. Calculations, which are typically done by software integral to the SST, are as follows:
- Shear stress
![]()
Where:
- τ0 = shear stress
- P = average load amplitude
- A = sample cross sectional area
- Shear dynamic modulus for each frequency tested
![]()
Where:
- |G*| = shear dynamic modulus
- τ0 = shear stress
- γ0 = shear strain
- Phase angle for each frequency tested
![]()
Where:
- φ = phase angle
- ti = avg. time lag between stress & strain (s)
- tp = average time for stress cycle (s)
Simple Shear at a Constant Height (SSCH)
The maximum shear strain and recovery are calculated as follows:
![]()
Where:
- γmax = maximum shear strain
- δshear,max = maximum recorded deformation by the shear LVDT during the test
- δshear,initial = initial recorded deformation by the shear LVDT at the beginning of the test (should be zero)
- h = sample height (platen to platen)
![]()
Where:
- Recovery = recovery of the sample
- δshear,max = maximum recorded deformation by the shear LVDT during the test
- δshear,final = final recorded deformation by the shear LVDT at the end of the test
- Monismith, C.L. (2004). Rutting Characterization of Asphalt Concrete Using the SST. Unpublished book chapter received by personal correspondence from the author.↵
- Witczak, M.W.; Kaloush, K.; Pellinen, T.; El-Basyouny, M. and Von Quintus, H. (2002). NCHRP Report 465, Simple Performance Test for Superpave Mix Design. Transportation Research Board, National Research Council. Washington, D.C. http://gulliver.trb.org/publications/nchrp/nchrp_rpt_465.pdf.↵
- Bennert, T.; Maher, A. and Smith, J. (2004). Evaluation of Crumb Rubber in Hot Mix Asphalt. Center for Advanced Infrastructure and Transportation (CAIT) Rutgers Asphalt/Pavement Laboratory (RAPL), Rutgers University, Department of Civil and Environmental Engineering. Piscataway, NJ.http://www.cait.rutgers.edu/finalreports/BAY-RU9247.pdf. Accessed December 2004.↵
- Sousa, J.B.; Solaimanian, M. and Weissman, S.L. (1994). Development and Use of the Repeated Shear Test (Constant Height): An Optional Superpave Mix Design Tool. Strategic Highway Research Program, National Research Council. Washington, D.C. http://gulliver.trb.org/publications/shrp/SHRP-A-698.pdf. Accessed December 2004.↵
- Weissman S.L.; Harvey,J.T.; Sackman, J.L. and Long, F. (1999). Selection of Laboratory Test Specimen Dimension for Permanent Deformation of Asphalt Concrete Pavements. Transportation Research Record 1681. Transportation Research Board, National Research Council. Washington, D.C. pp. 113-120.↵
- Harvey, J.T.; Guada, I. and Long, F. (1999). Effect of material Properties, Specimen Geometry, and Specimen Preparation Variables on Asphalt Concrete Tests for Rutting. Report to Office of Technology Applications, FHWA, Pavement Research Center, University of California, Berkeley.↵
- Bennert, T.; Maher, A. and Gucunski, N.. (2003). Evaluation of Modified Binders. FHWA-NJ-2003-017. Center for Advanced Infrastructure and Transportation (CAIT) Rutgers Asphalt/Pavement Laboratory (RAPL), Rutgers University, Department of Civil and Environmental Engineering. Piscataway, NJ. http://www.cait.rutgers.edu/finalreports/FHWA-NJ-2003-017.pdf. Accessed January 2005.↵

